6.5 in165 mm
- EPS core
- R-23
- GPS core
- R-29
Structure, insulation, air barrier and vapour barrier in a single engineered panel — MGO skins permanently bonded to a high-density EPS core under hydraulic press, then CNC-machined to your drawings.
Every Titanwall MGO SIP is a five-layer assembly: two white MGO exterior skins, two layers of specialised structural glue, and a high-density EPS core between them. The result behaves as one solid structural unit, not as separate materials stacked together.
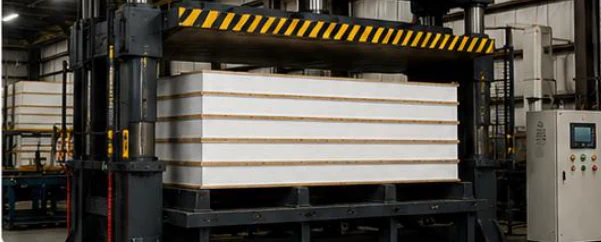
The panels are not simply glued. Structural glue is applied evenly to the MGO skins and EPS core, the layers are assembled and placed in a hydraulic press, and extreme uniform pressure is applied across the whole panel until cured — forcing the adhesive deep into both surfaces.
Specialised structural glue is applied evenly to the MGO skins and the EPS core.
The layers are stacked and placed into a hydraulic press.
Extreme, uniform pressure is applied across the entire panel until the bond has cured.
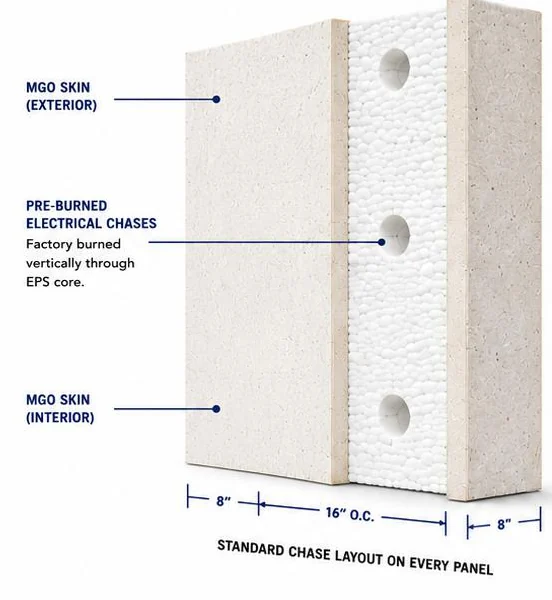
Every panel is manufactured with pre-burned circular electrical chases running vertically through the EPS core. Electricians pull wire through the channel without drilling framing members or modifying the structure — so the structural integrity of the panel is never compromised on site.
In conventional construction, electrical wiring is run through the stud cavities — and the interior then typically needs a separate poly vapour barrier before drywall.
With the Titanwall MGO SIP system, no separate polyethylene vapour barrier is required as part of the wall assembly. So installing outlets and switches doesn’t mean working around, cutting or repairing a layer of interior poly.
Wiring is routed through the pre-planned electrical chases in the EPS or GPS insulation core, electrical boxes are installed directly into the panel, and the interior is then finished to the project specifications.
| Conventional stud wall | Titanwall MGO SIP wall | |
|---|---|---|
| Wiring route | Through the stud cavities | Pre-planned chases in the EPS or GPS core |
| Securing wire | Stapled to every stud | No stapling to studs |
| Insulation | Insulated stud cavities | Continuous core, already in the panel |
| Vapour barrier | Separate poly — worked around, cut and repaired at outlets and switches | No separate poly required |
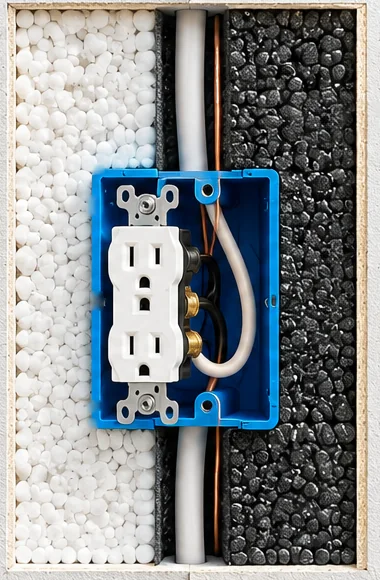
It may look like an ordinary electrical outlet when the building is finished — but what’s behind it is very different.
Shown with both core options side by side for comparison — each panel is made with one.
That’s the Titanwall difference: simplifying what’s inside the wall while improving what the wall is designed to do.
| Panel construction | MGO / EPS / MGO |
|---|---|
| Exterior face (both sides) | White MGO sheathing |
| Core | High-density EPS |
| Panel thickness (standard) | 4.5″ / 6.5″ / 8.5″ / 10.25″ |
| Standard panel sizes | 4′×8′ / 4′×9′ / 4′×10′ / 4′×12′ / 4′×16′ |
| Panel weight (approx.) | 1.5 – 2.5 psf, varies by thickness |
| Acoustic performance | Base STC ~24 (unofficial) |
| Fire rating capability | 1 – 4 hour assemblies possible |
R-value, 6.5″ panel
Magnum® MGO board is a fibreglass-reinforced, cementitious sheathing with no organic binders — so the fire performance is a property of the panel itself, not a coating added in a secondary layer.
When it comes to insulation, more isn’t always proportionally better.
R-value measures resistance to heat flow. As insulation is added, heat loss drops dramatically at first — but the benefit of each additional R-value becomes smaller as the wall reaches higher levels of insulation. That’s the idea behind diminishing returns.
So the goal isn’t simply to build the thickest wall possible.
The goal is to build the right wall for your climate, your building and the performance you want.
Titanwall MGO SIP panels let you select the insulation and panel thickness that make sense for your project. EPS provides approximately R-3.8 per inch, while GPS graphite insulation provides approximately R-5.0 per inch — giving you the ability to achieve greater R-value without simply continuing to make the wall thicker.
Showing EPS core — select a core above. Same MGO skins, three panel thicknesses.
A high R-value is valuable — but how the insulation is installed matters too. Traditional framed walls contain studs, headers and other structural members that interrupt the insulation and create paths for heat to travel through the wall.
With Titanwall, the insulation core is continuous throughout the panel, helping reduce thermal bridging while the MGO skins form part of the complete panel system.
So when you’re comparing building systems, don’t look at the insulation number alone. Look at the entire wall.
Higher R-values reduce heat loss — but the biggest gains happen at lower R-values.
Illustrative model of whole-building heat loss; actual savings vary by climate, design and air-tightness.
A home in southern Alberta, a mountain cabin in Montana and a building in Arizona don’t experience the same conditions. That’s why we don’t believe every project needs exactly the same panel.
The question isn’t “How much insulation can we put in the wall?”
It’s “How do we build the wall to perform better?”
That’s the Titanwall approach.
Size the right panel for my project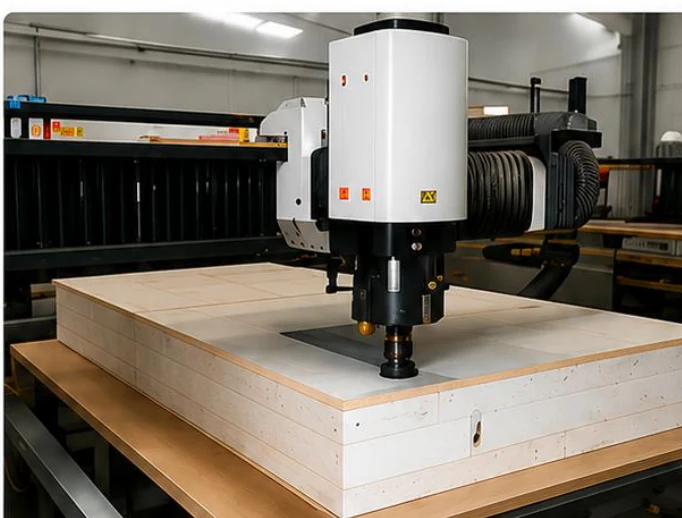
Panels are machined to the approved shop drawings rather than cut on site, which is what makes the envelope arrive straight, plumb, and ready to assemble in sequence.
In cutting and slotting.
From design straight through to production.
Reduces human error.
With fewer workers.
Enables custom solutions.
Through automation.
Labelled for fast assembly on site.
The same panel, every run.
Proper base plate installation is essential to the structural integrity and performance of the building system. Step through it below.
Make sure the concrete surface is smooth and clear of dust and debris.
Snap lines for your building and measure 1/2″ back for the plates.
The plate is set back 1/2″ from the building line.
Apply two lines of butyl or glue to the concrete.
Lay the lumber on top of the butyl or glue and make sure it lines up with the lines.
Ensure all lumber is pressure treated and suitable for the environment.
Install anchor bolts from lumber to concrete and tighten the bolts.
Choosing Titanwall gives you access to a network of trusted partners and premium products, so the project runs from concept to completion through one point of contact.
Plans tailored for SIP compliance and local codes.
Ask about this →Experienced contractor referral with our systems.
Ask about this →Superior insulation and strength below grade.
Ask about this →Stronger, lighter and corrosion resistant.
Ask about this →Designed for strength and efficiency.
Ask about this →Stronger spans and performance.
Ask about this →Durable, low maintenance and energy efficient.
Ask about this →Complete selection of windows, doors, fasteners and more.
Ask about this →How a Titanwall building goes together floor by floor — wall, top plate, joists, sheathing — from the frost walls to the ridge beam.
See inside →Side-by-side against stick framing and poured concrete, what the cost difference actually looks like over 30 years, and what happened at the Paskwa wildfire.
Read the comparison →Commercial, residential, affordable housing and custom builds delivered with Titanwall MGO SIPs.
See the work →